Thursday, December 20, 2012

Homemade Sweet Shop: Favorite Family Recipes

by Maria Noël Groves, Clinical Herbalist & Co-op Wellness Educator

It's just a few days before the big family Christmas gathering, and I never did find the time to figure out how to make fancy hand-crafted chocolates and caramels to give away. So tonight you'll find me stocking up on the ingredients for my favorite quick-to-make and popular holiday give-away: homemade hot fudge.

During the holidays, I tend to put a few of my good health habits aside and indulge in a day or two of intense baking. I’d tell you that the tasty treats I make are full of whole grains and nuts, but it’d be a lie. This time of year, I want nothing less than the festive sweet treats I learned how to make from my mom. These recipes do get a little bit of an upgrade. Crisco has been replaced with organic shortening made from palm oil. My organic, grass-fed butter is so yellow it gives my sugar cookies a golden hew.

These recipes are truly yummy and make great gifts! If you’re turned off by the amount of sugar and butter in such treats, remember that moderation is key. One of my thin sugar cookies has less than 35 calories, and a heaping teaspoon (1/2 ounce) of hot fudge has about 50 calories. I never eat a whole batch, either. Remember: These are gifts that you'll primarily be giving away. They freeze well, too.


Brigham’s Hot Fudge Sauce
My mother got this in a homemade book of recipes as a wedding gift. Supposedly it is the original recipe, and it is the best hot fudge you’ll ever have! This recipe makes a QUART of hot fudge, so plan to bring it to a party, give some away, or freeze it in smaller containers. It keeps for about a month in the fridge. When cold or room temp, it will be very thick, almost fudge-y, so you’ll want to warm it to pour over ice cream or brownies. Buy the best quality chocolate you can find or afford; your fudge will be much better for it. Hershey’s brand will NOT do. Trust me. I tend to use twice the chocolate and half the sugar of the original recipe, but you can make yours to taste.
  • 4 oz to 8 oz of quality, unsweetened baking chocolate
  • Up to 1 package of confectioner’s sugar
  • 1 stick of butter (no substitutions!)
  • 1 can (13 1/2 oz) evaporated milk
  • 1 tsp vanilla
Melt butter and 4 oz of chocolate in a saucepan. Alternately add milk and half of the sugar. Taste to and add more sugar and/or chocolate as desired. Stirring, bring to a slow boil (bubbles just around the edge of the pan). Remove from heat, add vanilla, stir. Pour into one quart jar or into smaller jars. Keep refrigerated or freeze. (It is not shelf stable.)
 

Sugar Cookies
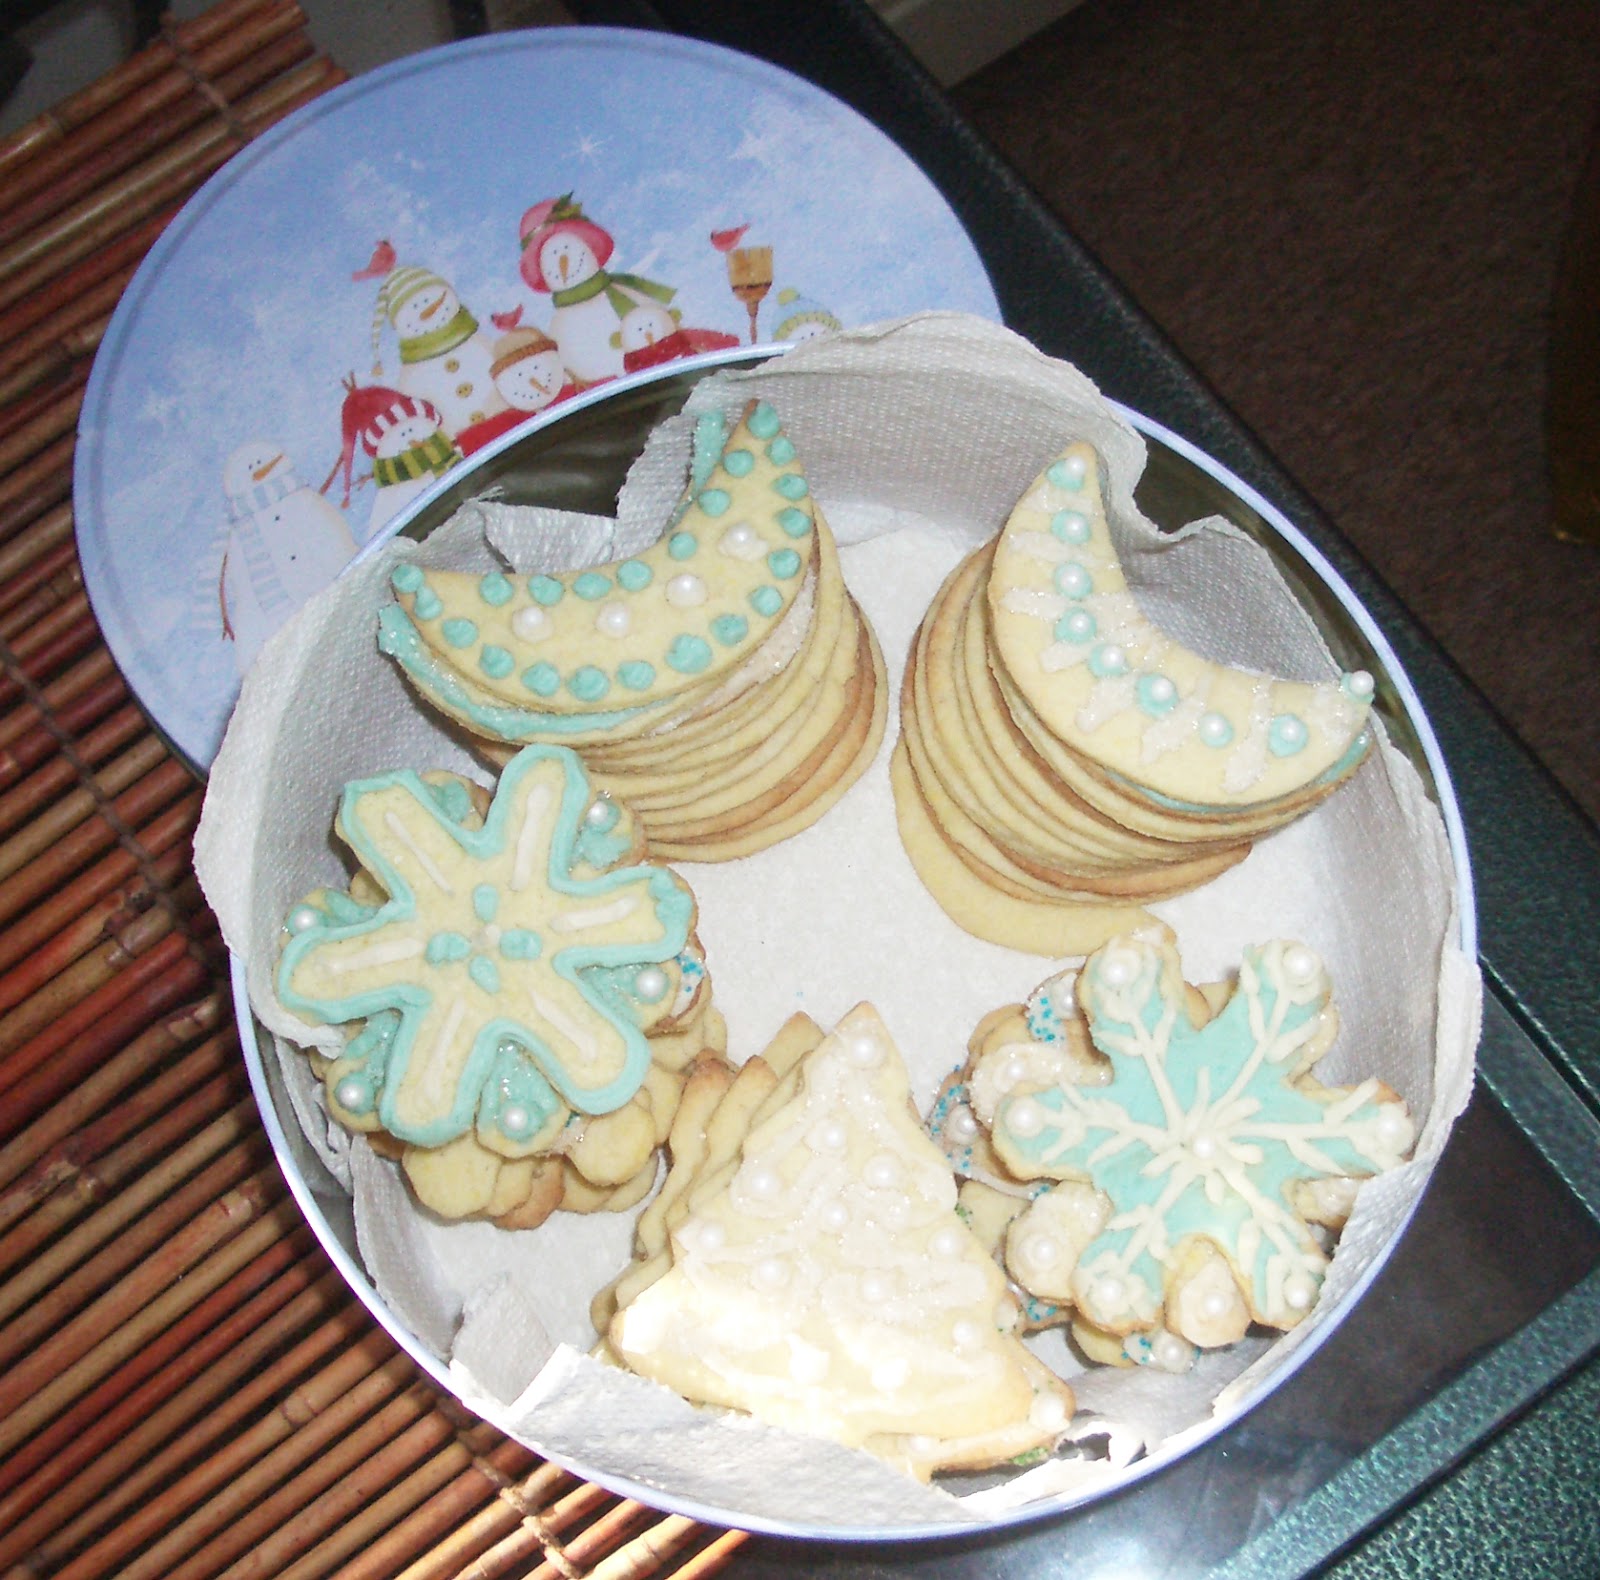
Absolutely delicious, but very time-consuming to make. Use a variety of cookie cutters like snowflakes, stars, and Christmas trees, but try to opt for simple designs with pieces that won’t break off easily. Visit your local kitchen shop for unique cookie cutter shapes. I have a collection of snowflakes and other nature-inspired cutters from Things Are Cooking in downtown Concord. A basic confectioner’s sugar, vanilla, butter, and milk frosting is great on these cookies, though I also leave some of the batch unfrosted. You probably don’t need to double the batch; a single batch makes about 100 cookies!
  • 3/4 cup butter
  • 1 cup sugar
  • 2 eggs
  • 1 tsp vanilla
  • 2 1/2 cups flour
  • 1 tsp baking powder
  • 1 tsp salt
Mix dry ingredients, then mix in wet ingredients thoroughly.
Cover and chill for one hour.
Preheat oven to 400°F.
Roll 1/8-inch thick, cut into shapes.
Carefully transfer to ungreased baking sheet with spatula.
Bake for 6 to 8 minutes, until golden. Watch carefully – they burn easily! Cool on a rack.
Click here for more holiday tips and recipes for Molasses Cookies, Italian Anise Cookies, and Toffee.

Thursday, November 29, 2012

Gifts You Can Drink: Herb & Fruit Cordials

With Maria Noël Groves, Clinical Herbalist & Co-op Wellness Educator

Festive cordials featuring seasonal produce like apples, pears, and cranberries are a delicious way to celebrate the holidays, both to serve at gatherings and give as gifts. Fruit and herbs combine beautifully in simple, delicious recipes with limitless possibilities. You won't believe how easy they are to make!

Here are the basic recipes to get you started. Be sure to use the best quality alcohol you can afford. I really like Flag Hill's General John Stark Vodka made with apples from Apple Hill Farm in Concord. It's available at select liquor stores.


Basic Cordial (~25% alcohol)
  • 1 part simple syrup, honey, or maple syrup (ie: 2 2/3 ounces)
  • 2 parts quality vodka, brandy, or other spirit (ie: 5 1/3 ounces)
  • Chopped fruit, herbs, spices, etc. 
Make your simple syrup (if using – see recipe below). Loosely fill your jar with desired fruit and herbs. Pour in your syrup and alcohol. Let sit for up to one month, shaking daily. Taste every day or two and strain when it tastes good to you. Strain through a cloth-lined colander or strainer, and squeeze as much out as you can with your hands. Store in glass in a cool, dark, dry spot.


Simple Syrup
Simple syrup without herbs will last in the fridge for at least a month. It’s an ingredient in
cordials, elixirs, and some herbal syrup recipes. If you add herbs, it should be preserved with alcohol or frozen to give it a longer shelf life.
  • 2 part sugar
  • 1 parts water
  • Handful herbs (optional) 
Simmer until the sugar is dissolved. You may infuse (steep) or decoct (simmer) this with herbs (just eyeball it) for about 30 minutes, then strain.


What to do with cordials?
  • Drink them in a cordial glass for or with dessert.
  • Add them to mixed drinks.
  • Add them to hot tea or coffee for a kick.
  • Drizzle them over ice cream, cakes, and fruit.
  • Heat them up and thicken with cornstarch to use on desserts for a thicker, sauce-like consistency.
  • Serve them in chocolate cups.
  • Use them in marinades and sauces.
  • Give them as gifts in cute bottles

Spiced Pear Cordial in Maple Syrup
This recipe makes about one pint of cordial and will keep for at least one year in the liquor cabinet.
You can easily double or triple the batch. It’s a little unusual in that it’s a cooked cordial. It takes a little extra time, but it really brings a richer flavor from the pears and spices.
  • 2 small, ripe pears (or 1 large), sliced
  • 4 ounces of local maple syrup, preferably grade B
  • 2 ounces of water
  • 2 cinnamon sticks
  • 1/2 teaspoon grated nutmeg
  • 6 whole cloves
  • 1/2 vanilla bean, sliced lengthwise
  • 2 cardamom pods, crushed
  • 8 ounces quality vodka*
Simmer the pears and spices in the maple syrup and water for approximately one hour. Remove from the heat occasionally if it seems to be boiling too hard. Pour all the ingredients into a mason jar. (Remove the cinnamon sticks if you want the cinnamon flavor to remain subtle.) Cover with vodka, cap, and let sit on the counter for one to four weeks, shaking daily. Taste it every few days. The
flavor will gradually change, becoming more spicy and less fruity/nutmeg-y over time. When it tastes good to you, strain your cordial into bottles, and enjoy!


Quick Cordial Recipe Ideas
  • Lemongrass Cordial: Loosely fill with fresh or fresh-frozen snipped lemongrass stalks (thick bottom parts). Cover with a 1:2 ratio of syrup:alcohol. Let sit for 2+ days, tasting daily.
  • Apple Cinnamon Cordial: Use a similar recipe as the pear cordial, swapping in apples, double the cinnamon, omit the cardamom.
  • Cape Codder: Simmer cranberries in simple syrup and then add alcohol in a 1:2 ratio.
  • Cinnamon Blueberry Cordial: Simmer blueberries, mashing them, with simple syrup. Put 1 cinnamon stick in the jar. Cover with a ratio of 1:2, let sit to taste. Remove the cinnamon if it is getting too strong but does not yet have the blueberry flavor you want.
  • Winter Toddy Cordial: Cover chopped ginger, lemons, and thyme with a 1:1 or 1:2 ratio.
  • Sweet Anise Cordial: Perfect for Sambuca-lovers! Fill your jar about a quarter to halfway full with equal parts dried Korean licorice mint (from the garden, if you don't have any, just stick with star anise and fennel), star anise pods, and fennel seeds. Cover with a ratio of 1:2 simple syrup and vodka, and let sit for a few days before straining.
  • Spearmint Cordial: Perfect for sweetening homemade Mojito and Mint Julep cocktails. Chop fresh spearmint, rub leaves and loosely fill jar. Cover with a ratio of 1:2 simple syrup and vodka, and let sit for a few days before straining (or to taste).
For more information and recipe ideas, click here.

Monday, November 12, 2012

Chef's Stuffing Rant & Turkey Tips

By our Chefs

The classic conundrum at Thanksgiving time is whether to stuff the turkey or cook your stuffing separately. Many people stuff their turkeys out of tradition, but it’s the worst thing in the world you can do to your Thanksgiving dinner. In order to cook the stuffing to a temperature that kills any potential pathogens, you have to overcook your turkey. If you cook the turkey perfectly, the stuffing poses a food safety risk. So, Salmonella stuffing or a dry turkey - which would you prefer? Stuffing the turkey is an antiquated cooking method. In the old days, people didn’t have much space in the oven or many pans in the kitchen to make all the Thanksgiving dishes separately.

It’s time to ditch tradition in favor of a better meal. I recommend cooking your stuffing separately, and of course as a Chef, I don’t use the boxed stuff.

Chef Mike’s Homemade Stuffing

Bread: The first secret to delicious homemade stuffing is good bread. Opt for raisin, onion, and/or olive bread, bagels, etc. Feel free to mix them up. Cube the bread (crusts on).

Chicken Broth:
Soak the bread cubes in good chicken broth. You can make the broth from scratch, but I also like Better than Bullion chicken broth base for flavor and convenience.

Vegetables: Add whatever vegetables you like, and cook them in the broth: carrots, celery, onions, kale, apples, etc. Don’t worry about peeling the apples and carrots; I don’t.

Herbs: Sage is a classic herb to season stuffing, but you have to be careful not to overdo it. I use about 1 tablespoon of chopped fresh sage (or 1/2 tablespoon dry sage) per quart of stuffing. Of course, you can opt for different herbs such as thyme, parsley, rosemary, and/or chives.

Fat: I also like to add fat for flavor. Some people use butter, but I prefer to cook up hot Italian pork sausage and/or bacon, and then add it to the soup.

Putting it All Together: For every 1/2 cup of bread, add about 1 cup of broth, and let it soak into the bread. You can serve it as is or bake it in a casserole dish at 375°F until the stuffing reaches 142°F and has the moisture level  you like.

Relax: Don’t want to go through the trouble of making your own stuffing? You can buy our homemade apple sausage stuffing in the deli!

Chef’s Turkey Tips

Get It Fresh: There’s a definite difference between fresh and frozen turkeys when it comes to your Thanksgiving roast. Freezing a turkey squeezes a lot of moisture from the meat. A fresh turkey will be inherently more moist and delicious.

To Brine or Not to Brine? This is an optional step, but I do like to brine my turkey at home. The final turkey won’t brown as nicely as an unbrined turkey, but it will be more moist and flavorful. Combine two gallons of water, three cups of sugar, and three cups of salt in a cooler, and let the turkey sit in this solution in a cooler overnight.

Salt & Pepper: Before you put your bird in the oven, rub the outside and inside with ample salt and pepper. This is all I do to the outside of the bird, but sometimes I like to add a few flavorful ingredients to the cavity. Sliced lemons, garlic, apples, butter, and/or herbs will flavor the finished turkey nicely. Because they’re not as dense as stuffing, they’ll be safe to eat when the turkey is cooked to perfection. This is optional, but the salt and pepper is not.  Salt and pepper help encourage browning of the meat, also known as the Maillard reaction. Proteins and sugars react with the heat to brown the food, creating hundreds of different flavor compounds that make the food significantly more delicious to the human taste buds than it would without the browning. Seasoning the inside and outside of the bird helps the flavor permeate all of the meat.

Bake: I prefer to bake my turkey in a hot oven at 450°F for just about 2.5 hours, or until the outside has browned nicely and the meat reaches a temperature of at least 160°F. I don’t put any foil on top, nor do I baste the turkey.

Rest: Let the bird sit for at least a half hour under foil to let the meat rest so the juices redistribute throughout the bird. This is a good time to make the gravy.

Gravy: Remove the turkey from the pan, and put the pan on the stove. Turn it on high and add a half of a bottle of white wine, using it to deglaze the browned bits from the bottom of the pan. Make a slurry of equal parts cornstarch and water, whisk it into the pan a little at a time until you reach the desired consistency.

Leftovers! Definitely make soup with the carcass. I don’t get much past turkey sandwiches with mayonnaise and sharp cheddar cheese on good bread with hot sauce. But you can also use the leftovers in turkey enchiladas and all sorts of other dishes.

Call 603-225-6840 to place your Thanksgiving turkey, fresh-baked pies and roll orders, or to order fully cooked meals. Stop by the Deli case for all sorts of delicious sides made by our Chefs. Vegan Tofurky is available in our freezer case.

Monday, November 5, 2012

Delve Into the Autumn Harvest: Perfect Pears

By Maria Noël Groves, Clinical Herbalist & Co-op Wellness Educator

Sippin' Cordial & Dehydrating Pears
Sweet and juicy or crisp and crunchy, pears make an easy snack or dessert that delight the senses this time of year when they reach perfection. If you are lucky enough to come across local pears, stock up! New Hampshire-grown pears are often smaller yet more flavorful than their long-traveling counterparts. The local season for pears has generally passed; however, you'll find a great selection of fresh local and organic storage pears in stores now.

We have friends in Manchester with a prolific pear tree that require us to bring home a laundry basket full each September. It’s always a mad dash to eat or prep them all before they go bad! Of course we’re grateful for the bounty; it’s become one of our fall rituals and introduced us to a variety of ways to enjoy the fruits.

Storing Pears: We immediately store most of the pears in the fridge and reserve a bowl to ripen on the counter as a functional autumnal decoration that reminds us to eat a few each day. Pears are best picked slightly underripe and will ripen within a few days at room temperature. Every day or two, we pull some extras out for the bowl. Underripe pears will only last about a week or so in the fridge, so it’s helpful to process the surplus to enjoy throughout the winter.

Preserving Pears: Our favorite way to work our way through the surplus is to dehydrate them. Dried pears are a delicious treat that are even sweeter than apple chips with a great chewy texture (reminiscent of the candy I love but try not to eat). I cut ripe pears into 1/8-inch slices and fill my dehydrator trays to the gills. They require no special prep, but I often sprinkle them with freshly grated nutmeg or some cinnamon to further enhance the flavor. You’d be amazed how many pears fit into a quart-sized mason jar once dehydrated and how quickly they get gobbled up!

We also freeze pears, much the same way we freeze apples: cored, sliced, and frozen in vacuum-sealed or Ziplock bags with as much air removed as possible. They’ll last for at least a year and can be pulled out as needed for pies, cobblers, crisps, and other recipes. If the peels bother you in finished baked goods, peel them before freezing.

We’ve also learned to make a few fun specialty foods with pears that are great for gatherings and gifts. “Pear Butter” is made almost like applesauce, adding extra spices like minced ginger root, nutmeg, and cloves. It’s great over vanilla ice cream, on pancakes or waffles, and on harvest-time roasts like chicken. You’ll find lots of recipes online. I also make Pear Cordial annually, which my students say is the best-tasting “herbal remedy” I pass around in classes. Sip it from a cordial glass or use it in seasonal cocktails like warmed, spiked cider with a cinnamon stick.

Spiced Pear Cordial in Maple Syrup
This recipe makes about one pint of cordial and will keep for at least one year in the liquor cabinet. You can easily double or triple the batch. My family takes Thanksgiving so seriously that they even give out party favors. I’ll be making an extra large batch of this cordial this year so everyone can go home with a bottle!
  • 2 small, ripe organic pears (or 1 large), sliced
  • 4 ounces of local organic maple syrup, preferably grade B
  • 2 ounces of water
  • 2 cinnamon sticks
  • 1/2 teaspoon grated nutmeg
  • 6 whole cloves
  • 1/2 vanilla bean, sliced lengthwise
  • 2 cardamom pods, crushed
  • 8 ounces quality vodka*
Simmer the pears and spices in the maple syrup and water for approximately one hour. Remove from heat occasionally if it seems to be boiling too hard. Pour all the ingredients into a mason jar. (Remove the cinnamon sticks if you want the cinnamon flavor to remain subtle.) Cover with vodka, cap, and let sit on the counter for one to four weeks, shaking daily. Taste it every few days. The flavor will gradually change, becoming more spicy and less fruity/nutmeg-y over time. When it tastes good to you, strain your cordial into bottles, and enjoy! I like it best within just a day or two.


More Pear Recipes


* I highly recommend the Flag Hill’s General Stark Vodka, which is made with apples from Apple Hill Farm in Concord. You’ll have to get it at their vineyard in Lee or a state liquor store.

Monday, September 17, 2012

Delve Into the Autumn Harvest: Kuri Squash

by Maria Noël Groves, Clinical Herbalist & Co-op Wellness Educator

Kuri Squash Ready for the Oven!
As soon as I saw them, I knew my fall game was on: Winter Squash. And not just the usual acorns and butternuts, but the fresh harvest of lesser-known local favorites like kuri and delicata. Salads, I'm done with you. It's time to turn up the oven.

Last year I fell in love with red kuri squash - a deep orange, pumpkin-like winter squash - because it is perfect in nearly every way. Simply cut it open, scoop out the seeds, and roast it at 420 degrees for about 40 minutes or until the flesh is fork-tender. This roasted squash is better than pumpkin for pie and suprpasses butternut as a Thanksgiving side. Sweet or savory, it compliments every dish and has a buttery, rich, and vivid in flavor, texture, and color. And it's *loaded* with antioxidant carotenoids, which help support your immune system, eyes, and dry skin (just what we need with dry, cold weather coming on!).

Fall Squash Decor
Here are just a few of my favorite ways to serve the roasted squash:
- Perfectly plain as a side dish - it's that good
- Piping hot with a dab of butter, drizzle of maple syrup, and sprinkle of cinnamon (as a side or for dessert)
- As a filling for "pumpkin" pie
- Added to chili to provide sweetness, heft, and added nutrition
- Pureed with coconut milk and simmered with lemongrass for a Thai-inspired soup
- fry some snipped, fresh sage leaves in butter, then make an egg scramble with a local egg, scoop of leftover squash, and chunks of cheddar
- use it to make "pumpkin" bread

Roasting Fall Faves: Brussels, Squash & Kale
In my other life as an editor, I know that nothing is ever perfect, and there are pros and cons to everything. As such, kuri squash won't hold up to baked-stuffed dishes (the skin gets too soft when roasted), doesn't peel easily, and unfortunately the seeds are relatively unpalatable when toasted. Delicata squash, on the other hand, are wonderful for all of these things and have a delicious, almost corn-like flavor when diced into chunks and roasted. (Delicatas are the long, narrow white-green-yellow striped squash.) Even better - cooked delicata squash skin is edible. No scooping or peeling needed!

Enjoy these squash while you can - they often sell out by late fall and do not keep as well as the old standby, butternut.

Stay tuned for more fall faves...

Thursday, August 30, 2012

The Humble & Amazing Potato

by Maria Noël Groves, Clinical Herbalist & Co-op Wellness Educator

Just when did potatoes become a "bad food"? Spuds have a nearly iconic presence in my family kitchen. We take them so seriously that on Thanksgiving Day, the only people allowed to *touch* potatoes during their transformation into mashed potatoes are my mother and myself. Boxed potato flakes? Please.

Potatoes are such a perfect carbohydrate for the New England kitchen because they are locally abundant, whole food, amazingly adaptable to a variety of dishes, and classically delicious. Sure, they are a bit high in the glycemic index, but if you keep your portion sizes reasonable - balanced with ample vegetables and some healthy forms of protein and fat - potatoes can be quite healthy. The average tater weighs in at just 220 calories (and  large potato easily serves two - really!). It provides a modest serving of both protein and fiber (about 5 grams each), vitamin C, B vitamins, and iron.

Local potatoes are flooding the Co-op shelves right now and will often be available as late as November and December when other forms of local produce are slim. I especially encourage you to check out the purple potato variety when it's available - it has a similar antioxidant value as kale and a gorgeous, shocking hue, yet it tastes just like any other potato. Stock up, and be sure to store them in a cool, dark, dry place that is well-ventilated. Sunlight turns them green, which makes them more bitter and mildly toxic. Moisture encourages mold and sprouting. Depending on storage conditions and variety, potatoes can store for weeks to months.

Oven-roasted potatoes are a perfect pairing for a summer veggie burger or autumnal roasted chicken. Adding fresh or dried rosemary in the last few minutes of cooking takes them to a new level. Finely chopped potatoes can be cooked into the skillet for a fast, healthy breakfast featuring almost entirely local ingredients:


Breakfast Skillet Eggs with Home Fries
This recipe serves two and can be multiplied for more. Be sure that your pan size allows the potatoes and onions to be in a single layer with some space in between, otherwise they won’t brown well. Cutting potatoes small, using cast iron, and adding a lid ensures the potatoes bake on the stove top. For a crowd, bake the potatoes and onions in the oven and serve with scrambled eggs on top.

1 Tbls or more extra virgin olive oil
1 large or 2 small potatoes, cut into 1/4-inch cubes
1 medium onion, chopped into about 1/4-inch pieces (cippolini onions are the best!)
1 1/2 ounce cheddar cheese, cubed (optional)
2 to 3 large eggs (local, free range, pastured)
Needles from 4 sprigs rosemary (or 1 tsp dry)
1/8 tsp turmeric powder
Two handfuls of fresh arugula or other tender green
Salt, pepper, and crushed red pepper to taste

Heat medium cast iron skillet over medium heat while chopping potatoes. Add oil, toss the potatoes in the pan, cover. Chop onions. Toss potatoes; when they’re a little golden, add onions to the pan, keep covered. Add more oil if necessary. Prep eggs and cheese. Whisk them together with salt and pepper. Add rosemary and crushed red pepper to skillet. Keep tossing the potatoes and onions, add some salt and pepper to them. When they’re cooked and golden, push them to the side of the pan and pour the eggs/cheese in the middle. Scramble everything together until the eggs are cooked. Serve on a bed of greens. Approximately 350 calories per serving.


Of course, potatoes lend themselves to a wide range of recipes. Click here for a searchable listing of more than 600 recipes from EatingWell.com.

Thursday, August 23, 2012

Eat More Kale

By Maria Noël Groves, Clinical Herbalist & Co-op Wellness Educator

Eat More Kale. It’s the mantra that’s sweeping the nation, spurred by a small-time garage business
Green, Lacinato & Red Kale
that got its start at the Montpelier farmers market 10 years ago with the now-viral, still-handmade t-shirts. (The biz is currently enduring the wrath of Chick-fil-A, which believes “Eat More Kale” sounds too much like “Eat Mor Chikin.” Learn more and buy your shirts and stickers at www.eatmorekale.com.) But Eat More Kale is more than a cute t-shirt with a compelling story, it’s the coming of age for one of the best vegetables on the planet.

My obsession with kale began almost two decades ago when I began learning how to eat these strange things called vegetables. Each week I widened my pallet with a new vegetable to throw into soup or put on pizza until my taste buds adapted to the new, green, mineral-rich flavors. Kale quickly climbed to the top of my favorites list. Why kale? I knew from working at Natural Health magazine that kale is *the* superstar in terms of nutrients and antioxidant density. But, more than that, it’s one of the most delicious, easy-to-prepare health foods, able to be grown in New Hampshire year-round (with the help of season extenders like hoop houses and cold frames), and extremely affordable. People who claim that healthy food costs too much haven’t compared the price of kale to a bag of potato chips.

If you’re a kale skeptic, start your future obsession with lacinato kale, also known as dinosaur kale, Tuscan kale, black cabbage, and nero di Toscana. In a recent survey of organic growers in New Hampshire, this variety of kale was the absolute favorite amongst farmers and backyard gardeners in terms of productivity and popularity compared to any other type of produce. The leaves are a beautiful, bumpy, verdant shade of emerald, and it keeps a tad better than some other varieties in the fridge. The flavor is milder and texture more pleasant, lending itself well to sautes, green smoothies, kale chips, tacos, egg scrambles, pizzas, stir fries, and other recipes. That said, any bunch of kale will do, and particularly lovely bunches of red Russian and other varieties often find their way into my kitchen.

Perhaps it’s the stems that are holding you back? While they are technically edible, most chefs remove the tough ribs for faster cooking and better flavor. You can trim them out with a knife, but I simply hold each leaf of kale stem-up and strip my fingers down the stem to pull off the tender leaves. Within just a minute or two, your whole bunch is ready to cook. Don’t be shy: Use that whole bunch in your recipe (or maybe two) – it cooks down quickly, and, let’s face it, we could all use a little extra green in our lives. Here's my latest, greatest kale recipe. What's YOUR favorite way to use kale? Let us know in the "Comments" section!

Kale Chips don't last long at our house!
Kale Chips
These are all the rage right now, and homemade is much less expensive and even tastier than pre-packaged because they’re wonderful still warm from the oven.
  • 2 tablespoons organic extra virgin olive oil
  • 1 head of kale, ribs removed, torn or cut into pieces
  • Salt and pepper to taste
  • Optional: spices, parmesan, ground nuts, etc
Preheat the oven to 325°F. Prep kale, and lay it on a large cookie sheet. Pour olive oil over the kale, and rub it into the leaves. Sprinkle with salt and pepper. Bake, tossing every 10 minutes, until they are crispy, about 20 minutes. Watch to be sure you don’t burn them! When they are almost done, sprinkle them with spices and/or Parmesan, if using.

Tuesday, August 14, 2012

Gonna Eat Me Lots of Peaches

by Maria Noël Groves, Clinical Herbalist & Co-op Wellness Educator

Peach season has officially arrived in New Hampshire! My household simply can't get enough of them. These sweet treats are amazing fresh, of course, which is how we mostly eat them. However, peaches are also phenomenal grilled as a dessert (plain or served with ice cream), side dish, or salad topper. Also try dehydrating them for a post-season snack, freezing them (sliced or whole) for future use, and making jam. My mother's homemade peach jam is a seasonal favorite atop vanilla ice cream, in plain yogurt, over cake, and on toast.

Peaches are a redeeming treat. Besides being sweet and tasty, recent research shows that peaches and other stone fruits (plums, nectarines) may fight obesity-related diabetes, inflammation, and heart disease. What makes them so special?  A synergistic blend of four types of phenolic groups - anthocyanins, clorogenic acids, quercetin derivatives, and catechins - work simultaneously in different types of cells for maximum impact. This is even better if you serve up peaches in a form that doesn't contain added sugar (sorry, Mom). Yet more proof that the diversity of antioxidants, nutrients, and phytochemicals in fruits and vegetables provides maximum impact for your health... and that good health can be delicious.

Here's a yummy recipe I learned from a fellow health educator that's great for potlucks and meals this time of year. Almost all the ingredients are available from local sources, too!

Peach & Blue Cheese Salad with Maple-Lemon Dressing
Layer on salad plates or one large salad bowl:
  • Bed of tender salad greens
  • Sprinkle of blue cheese (or slices of goat chevre if blue isn't your thing)
  • Sliced peaches, 1/2 to 1 peach per person (nectarines also work well)
To make dressing, mix together:
  • Juice of 1 lemon
  • Enough maple syrup to make it taste good
Drizzle dressing over salad. Enjoy!


Thursday, July 26, 2012

Get Inspired to Eat Better

By Maria Noël Groves, Clinical Herbalist & Co-op Wellness Educator

I have a confession to make: I LOVE "bad" food. Fast food, candy, french fries, bread, you name it. Over the past two decades, I've conditioned my taste buds to branch beyond standard American fare and enjoy a wide range of vegetables, vegetarian and ethnic fare, wild game, seafood, etc. But when I'm traveling or life gets busy, those old standbys are easy to turn to. That's fine, once in a while, but I definitely feel better when I'm eating well. One of the best things you can do to keep your diet healthy is to continually get inspired. Here are some of my favorite ways to do that:

* Be dazzled by fruits and vegetables. Key in on the produce aisle while shopping and also check out farmers markets and farm stands to keep your diet produce-heavy. Experiment with new ingredients and fresh herbs. Plan your meals around plants.

* Surround yourself with local, vegetarian, and healthy cookbooks, preferably with lots of great photos. Poke through them when dinner gets dull.

* Join foodie mailing lists and blogs such as www.eatingwell.com, www.101cookbooks.com, www.nourishingwords.net, www.pickyeaterblog.com, www.vegetariantimes.com, www.glutenfreegirl.com, and of course the Co-op Buzz Blog and newsletter! (Got a favorite blog? Share it in the "Comments" section!)

* Subscribe to healthy foodie magazines like EatingWell, Whole Living, and Vegetarian Times.

* Share food and recipes with friends and family who enjoy real, healthy food.

How do YOU stay inspired to eat good food? Share your tips in the "Comments" section below.

Bon appétit!

Tuesday, July 24, 2012

Salt: A Chef’s Perspective


By Audrey Burghard, Health and Wellness Coordinator at the Co-op

A couple weeks ago when Chef Mike and I were waiting in the hall to do a presentation to the AntiCancer group at Concord Hospital, we struck up an interesting conversation. I have the opportunity to hang out with Mike occasionally when we are working together on classes or cooking demos, and it’s fun to learn from him.

We were outside the room with our cook table ready to go, and I looked at a jar of sea salt. I proudly told Chef Mike that I don’t cook with salt and let people salt their food as needed at the table. I have always heard that salt is “bad” and we get too much of it in our diets. In many ways I’m a typical consumer and believe things that I hear.

I was pretty surprised by Mike’s response. He told me that he would fire me if I worked in his kitchen and made that statement about salt! Those of you who have met Chef Mike know that at times he can be direct. I on the other hand, I completely appreciate his honesty and wanted to hear more! I said to him, “Well, it’s a good thing I don’t work for you, but will you tell me more about salt then?” Chef Mike went on to tell me that people (including me) are misled about salt. Salt is what gives food a good flavor, and in the case of most meat, it is critical in cooking meat properly. Salting things before or during the cooking process brings out flavor and helps meat retain moisture. When meat is salted before cooking, it brings juices to the surface. When the meat is cooked those juices create the browning that we all like. The brown or seared surface traps moisture in.

In summary, here is Mike’s message about salt: Use salt for flavor in your food! When we salt things at the table, it just makes food taste salty. When it’s cooked in, it makes food flavorful. That makes a lot of sense to me, but you decide.

The role that salted food plays in our health has become a controversial topic. Conventional wisdom says to reduce salt, especially if you have hypertension. However, a growing group of experts and studies suggest that modest amounts of salt added to homemade food has much less of a negative impact, if any, on cardiovascular health compared to processed food jacked up with a variety of manufactured sodium substances. Of course, if you know you are salt-sensitive, you may want to go lightly.

As for what kind of salt to use, we all know that there are many kinds to choose from. Consider sea salt (with or without added iodine), kosher salt, grey salt, pink salt, Himilayan, Celtic, and the list goes on. Chef Mike says simply, “kosher.” So, consider taking your salt shaker off the table and putting it near the stove. When salt is used properly, your foods should be plenty flavorful, and you won’t need to reach for the shaker. It’s up to you to experiment with how much to use. Let me know what you think, and how you use salt!

In health,
Audrey

DIY Veggie Burgers

By Maria Noël Groves, Clinical Herbalist & Co-op Wellness Educator

Veg Burger Cooking

Homemade veggie burgers are a delicious way to celebrate seasonal produce and fresh herbs. Inspired by some delicious recipes, my husband and I now wing it with whatever is on hand. If you can, make extra to refrigerate or freeze and re-heat later in the toaster oven or skillet. They're also perfect for wraps and as salad toppings. Pick one or two items from each category, or branch off to try even more ingredients.

Vegetables
Grated Zucchini (raw)
Grated Summer Squash (raw)
Sliced Mushrooms (sauteed)
Chopped Celery (sauteed)

Flavor
Minced Garlic Cloves (raw)
Finely Chopped Onions (raw)
Spices: Whole Cumin Seeds, Turmeric Powder, Coriander, Crushed Red Pepper, Black Pepper
Herbs: Rosemary, Basil, Thyme, Oregano/Savory, Dill, Parsley, Sage (fresh, if possible)

Protein
Chickpeas (cooked, mashed)
Black Beans (cooked, mashed)
Black-Eyed Peas (cooked, mashed)
Pinto Beans (cooked, mashed)
Canned Salmon (drained)... ok, it's not veg, but it's yummy
Crumbled Feta
Crumbled Tofu or Tempeh

Sticky Carb
Precooked Rice
Precooked Quinoa
Shredded Potato (partially cooked, then grated)
Whole Wheat Bread Crumbs
Mashed Winter Squash or Sweet Potato (cooked)

Plus
1 or two eggs
Salt to taste

Mix all ingredients together, form into patties (2-3 inches in diameter, 3/4 inch thick). In a skillet, cook in olive oil on medium heat, about three minutes per side or until golden and cooked through.

Chickpea-Quinoa Burger
Need a more specific recipe to get started?
Here are some of my favorites from EatingWell & Whole Living:
Zucchini Potato Latkes
Bean Burgers with Spicy Guacamole
Salmon Rosti
Chickpea Brown Rice Burger

Thursday, July 12, 2012

Fresh Tomatoes!

By Audrey Burghard, wellness coordinator 

Summer time is great for fresh tomatoes. Here is one of my favorite recipes to have on hand for several applications. You can use this salsa in or on eggs, on chips or nachos, on a taco salad, or in a burrito with beans and rice. This salsa has respectable nutritional value and tastes great! When you have these kinds of items ready in the fridge, you will be less likely to go out to eat or resort to pre-packaged foods. You can increase the “heat” in this salsa by increasing the peppers, and if you don’t like cilantro, you can take it out.
  
Fresh Salsa
5 to 6 large tomatoes, diced (I also remove the seeds and slimy part J)
1 large Vidalia onion, diced
1 to 2 jalapeño peppers, diced very small (omit if you don’t like spicy foods)
1 Tbls olive oil
1 tsp ground cumin
Juice from 1 lime
1 small can of diced green chilies
1 to 2 garlic cloves, chopped fine
Cilantro leaves, chopped fine, to taste
Salt and Pepper to taste

Mix everything up and store refrigerated in airtight container for up to a week.

Enjoy!
Yours In Health,
Audrey


Thursday, June 21, 2012

Sippin’ Tea


By Maria Noël Groves, Clinical Herbalist & Co-op Wellness Educator

HolyBasilFlowers
My favorite morning tea blend is made with two simple herbs with seemingly miraculous health benefits: they boost metabolism, curb cravings, decrease inflammation, enhance immunity, energize but also calm the mind, fend off infections, and fight cancer. Sound too good to be true? Let me introduce Holy Basil (Ocimum sanctum) and its good friend Green Tea (Camellia sinensis).
Tulsi Greentea Box

One of the easiest ways to take this tea is to use the Organic India Tulsi Green teabags available at the Co-op; however, you can also grow Holy Basil (also known as Tulsi)  from seed or seedling in the garden much like culinary basil, then add it to your favorite organic Green Tea (personally I prefer Jasmine Green Tea). The effects are almost instantaneous, but you’ll do even better if you drink the herbs regularly.

The blend makes a great morning cuppa, but you can also drink it iced with a little honey as a healthy “energy drink” while off on summertime adventures. Enjoy!

Monday, June 18, 2012

Tasty Money Saver: Beans!


By Maria Noël Groves, Clinical Herbalist & Wellness Educator

As you swing past the Co-op’s new bulk department, you’ll notice a wide variety of dry beans. The various colors and textures look so nice (and, well, co-op-y) in the bins, yet a lot of people head straight for the canned stuff for the sake of convenience. Truth is, dry beans really aren’t as inconvenient as people think. They’re also an absolute bargain, healthier, and better-tasting.

The secret is in the planning. We cook up one or two pints of beans a week to keep in the fridge as needed. I soak and simmer them while I’m doing other things; they really don’t require a lot of attention.

Choose Your Bean: You *could* use all beans interchangeably, but I prefer certain varieties for certain types of dishes. Here are our favorites, but feel free to experiment with the many other types at the Co-op. We usually use one batch of beans in a variety of ways for the week.
      Chickpeas (aka Garbanzo Beans): Hummus, Italian dishes, Middle Eastern and Indian dishes, salads, fish dishes, quinoa dishes, sautéed with greens, scrambled with eggs/cheese/greens, ground up with veggies/egg/grain/cheese/herbs for veggie burgers
      Pinto Beans: Tacos (including breakfast tacos with eggs), chili, Southwestern and Mexican fare, rice dishes, baked beans, bean dip (aka: pinto pate)
      Black Beans: Same uses as pintos, but with a smaller, firmer texture that’s great for dishes like Texas caviar and to go with sweet potatoes and greens, also a secret ingredient for moist brownies
      Black-Eyed Peas: Same uses as black beans, also Southern dishes like rice and greens, or sautéed with bacon
      White Beans: They get mushy easily but are good for Italian dishes, dips and spreads seasoned with Italian herbs

Soak: This isn’t as hard as people think. Once you know what bean you want to use in dishes for the next few days, throw them in a pot and cover with double the amount of water. Let them soak on the counter or in the fridge for six to eight hours. For example, during the day while you’re at work (to cook at night) or at night while you’re sleeping (to cook in the morning). One of the nice things about dry beans is that you have control over how much beans you make. Expect them to double in size from dry to cooked.

Simmer: Drain the soaking water, and cover the beans with fresh water to about an inch above the “bean line.” Simmer on the stove, tasting occasionally for the desired done-ness. Most beans are done cooking in about 20 minutes. (I’m really not sure where all the recipes calling for two to three hours come from… maybe they’re using really old beans?) Remove from heat, stir in some salt if desired, and let sit for about 10 minutes before using in a dish or placing in a glass jar to store in the fridge.

Store: Salt will improve the flavor and help them keep longer in the fridge, but you may want to omit or limit it for health reasons. Cooked beans should keep at least five to seven days in the fridge. (You can also freeze them for later use, but I find they get lost in the freezer and don’t taste as good once thawed. It’s easy enough to make up a new batch.)

Start with some small batches so you can learn what you like and how to use the beans up during the week – and to get your digestive system used to beans – and then gradually increase. My husband and I are avid (localvore) carnivores, but beans now provide protein and fiber for the majority of our dinners (in place of or to lighten up meat dishes). It’s probably much better for our health and certainly better for our wallets and the planet. Enjoy!